Posted in Blog, Design Thinking, Facilitation, Lead, Virtual Facilitation by Jo North
Welcome to this step-by-step guide to how to use the breakout rooms functionality in Microsoft Teams.
Breakout rooms in Microsoft Teams make the life of a virtual facilitator so much easier, and the delegate experience more seamless and hassle-free.

Microsoft Teams Breakout Rooms – Overview
Use breakout rooms in Microsoft Teams meetings to split up larger groups into smaller ones, for more focused working and individual engagement:
- Make sure that you’re the meeting organiser and that you’re using the desktop rather than the mobile app
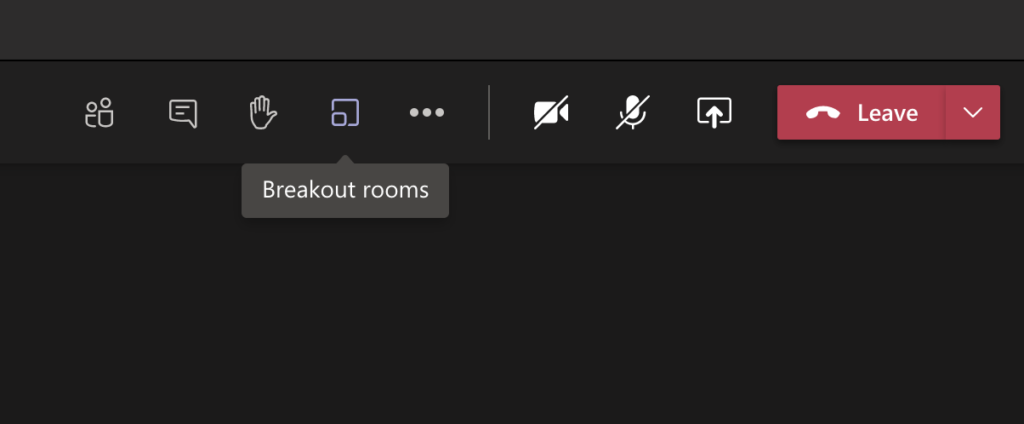
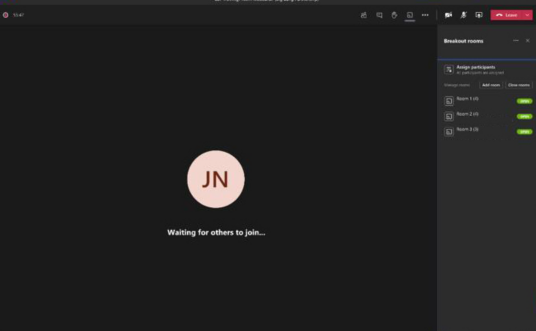
- Once your meeting has started, locate the breakout room icon in your control panel. Click on the icon
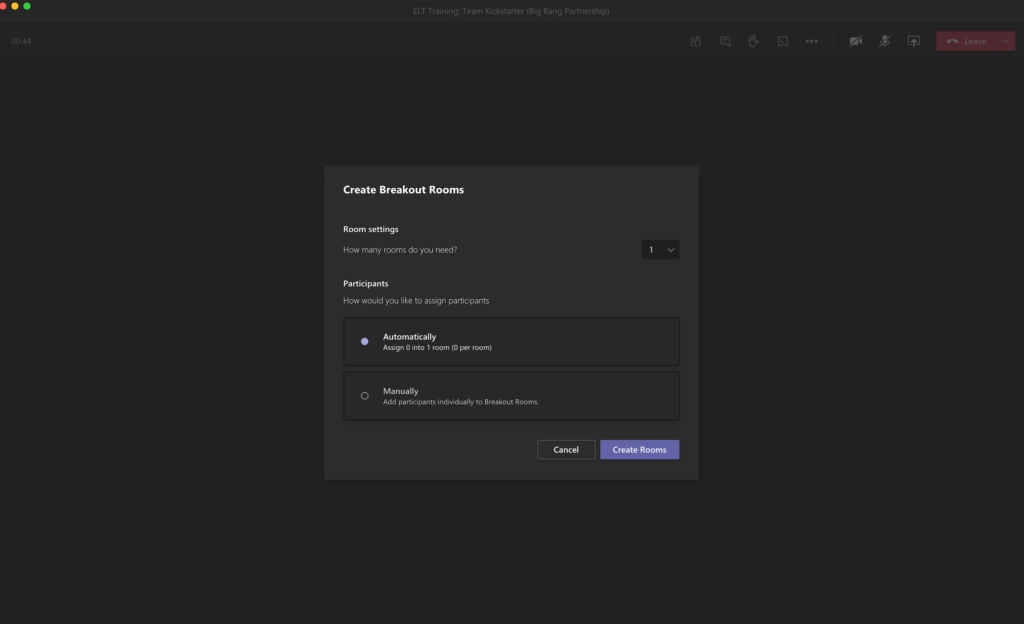
- A window will pop up inviting you to configure the breakout rooms
- Select how many rooms you’d like to use
- Choose whether you want to assign your workshop participants to the breakout rooms automatically or manually
- Click on ‘create rooms’ and rename them if you wish
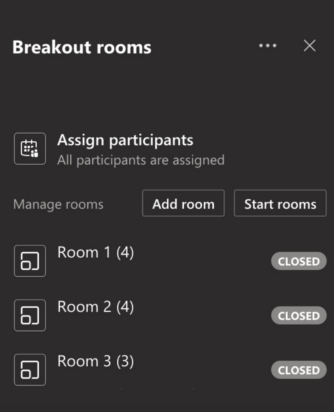
- Move attendees between rooms if you need to
- Open your rooms
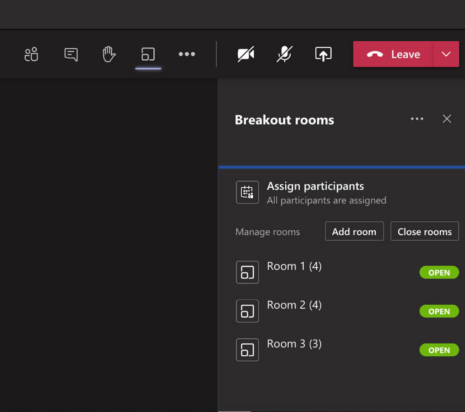
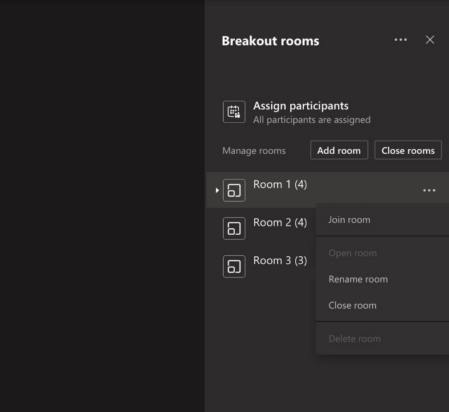
- To help with your virtual facilitation, you can move between the breakout rooms by clicking on the three dots icon next to the room you wish to join and selecting ‘join room’
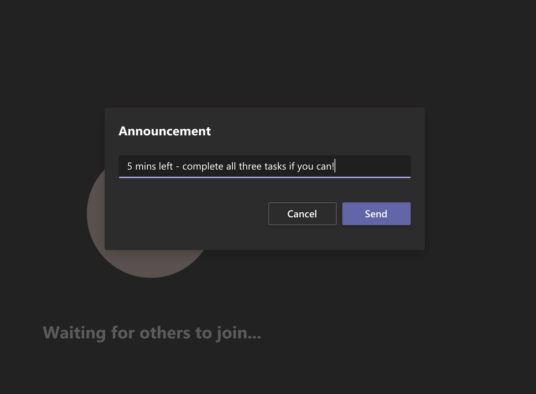
- Use the announcement feature to send messages to your workshop participants when they in are in their breakouts
- As the organiser, you can close the breakout rooms in Microsoft Teams from the main meeting room above the breakout room list. When you click on closed rooms the breakout room will close and participants will automatically be sent back to the main meeting. However, the participants and you as the organiser will still have access to the files, whiteboard or the recording of the breakout room.
- You can’t create breakout rooms if there are more than 300 people in a meeting.
- If you create breakout rooms before a meeting, you won’t be able to invite more than 300 people.
Why Use Breakout Rooms in your Microsoft Teams Online Meetings and Workshops?
Working with larger groups is great, but sometimes to get fantastic engagement in your online meetings and workshops, you need to ask your delegates to work in smaller groups, in virtual breakout rooms.
This is brilliant because, due to something called the Ringelmann Effect, the larger the group size the less likely most people are to engage.
This is due to factors such as psychological safety and feeling more comfortable contributing in smaller groups.
For tips and techniques to improve engagement in your online meetings, have a look at my article Virtual Facilitation: 10 Top Challenges & What to Do About Them.
Breakout groups can also be useful if you want different groups to tackle a different question or challenge, which can be great for design thinking and innovation sprints, creative problem solving workshops, strategy and business planning sessions and team building challenges.
Each group can share its feedback with the wider group in plenary after the breakout has finished.
Step-by-step Guide to Microsoft Teams Breakout Rooms
Step 1: Before You Start
You can only create breakout rooms in the Microsoft Teams desktop app, and you need to be the meeting organiser.
However, participants can join the breakout rooms using Microsoft Teams from their desktops or mobile apps.
Step 2: Get Started
As the organiser for your Microsoft Teams meeting, you’ll first need to start the online meeting, either as a scheduled or unscheduled meeting.
Once you’re in the meeting, you’ll see that there is a breakout room icon in the control panel. Click on this icon. This will display a window to help you configure the breakout rooms.
Step 3: Make Your Selections
First, you need to select how many breakout rooms you wish to use.
Next, select whether you want to assign your workshop participants to each room manually, or if you’d like Microsoft Teams to automatically assign them. You will not be able to choose this option later unless you create new breakout rooms.
When you’re happy with the settings, click on ‘Create rooms’. You can rename your rooms by clicking on the three dots next to each room and selecting the ‘Rename’ option. Now you can give it a different name and click on ‘Rename room’ to confirm.
Helpful hints
- If you want to move a workshop participant into another room, click on the room to display all the attendees in that particular room, click on the checkbox next to the name of the participant you want to move, and then click ‘Assign’. This now displays the other breakout rooms you can assign the person to, and then you can select the room you want, and your participant will be moved into that room.
- If an attendee arrives late to your workshop after the breakout rooms have started, you’ll find them under the ‘Assigned participants’ area. You can click on their name and then assign them to a room.
- Currently, you can only move participants between rooms when the breakout rooms are closed.
- If you decide that you need to create some additional rooms, click on the ‘Add rule’ button, and then move people around to each room.
- All the participants in the breakout rooms are given presenter roles as default, meaning that they can share their screens. However, you can allocate presenter roles to specific attendees in the breakout rooms only. If you choose to do this, you’ll need ideally to set it up before the breakout rooms start. This could be useful if you want to allocate certain people to be the leaders of breakout rooms, to help facilitate the meetings.
Step 4: Open Your Breakout Rooms
When you’re all set up, click on the three dots next to a specific room, and select open, or you can click on the ‘Open rooms’ option to open all the rooms in one go. This changes the status of the rooms from closed to open. The attendees will automatically be moved into their breakout rooms.
Inside the breakout rooms, your workshop participants will be able to access all the usual features in Microsoft Teams, such as using Together mode, or using a whiteboard to collaborate on a task.
Microsoft Teams will also save the completed work on a whiteboard within the meeting rooms chat so that participants, or you as the facilitator, can access it at a later date.
Step 5: Manage and Move Between Breakout Rooms
As the organiser or facilitator of the workshop, you can drop into different rooms by clicking on the three dots icon next to the room you wish to join and selecting Join room.
This is a great way of seeing how your delegates are progressing and gives you the opportunity to engage in discussions and activities.
You can leave the breakout room and then return to the main meeting by clicking on the ‘Return’ button.
Recording breakout rooms
If you want to you can record each breakout room.
If you want the recording to stop, you’ll need to select ‘Stop recording’ by going to each room, otherwise the recording will continue, even if no one is in the room.
Sending messages to delegates in breakout rooms
To send messages to all the participants while they’re in their breakout rooms use the announcement feature in Microsoft Teams. From the main meeting room click on the three dots, next to the breakout rooms, and select ‘Make an announcement’. You can type your message, and then click ‘Send’.
Your message will be displayed in the meeting chat in each breakout room, and give a notification to each delegate that an announcement has been made.
I like to this feature to let participants know how long they have until the breakout rooms are closed, for example.
Step 6: Close the Breakout Rooms
As the organiser you can close the breakout rooms in Microsoft Teams from the main meeting room.
Above the breakout room list, click on ‘Close rooms.’
The attendees will see a notification, stating that their breakout room will close in one minute.
They will automatically be sent back to the main meeting and you will see that each room has closed.
Your delegates cannot go back into their room. However, both you and your participants will still have access to the files, whiteboard or the recording of the breakout room within the meeting chat, and they access this again as a later date if they wish.
Other participants can only access the materials from the room that they were assigned to. It is possible, though, to create a new grouping of participants in each room by clicking on the three dots icon next to breakout rooms heading and selecting ‘Recreate rooms.’
Microsoft Teams Breakout Room Functionality for Delegates
Here are features that your delegates are able to experience in their Microsoft Teams breakout rooms:
- They will be able to join breakout rooms from the web, desktop, iOS, iPads, Android mobiles and tablets, although organisers cannot move delegates who joined via Desk phones or Teams devices to a breakout room. They’ll need to remain in the main meeting as their breakout room.
- Participants join the room as presenters, so they can share slides, the whiteboard, etc. as they can in the main meeting.
- Participants cannot add others to meeting chat, copy meeting details, nudge others to the meeting, or use “call me back”
- Meeting participants cannot pop back to into the main meeting or between rooms on their own. They have to wait for the meeting organiser to bring them back to the main meeting.
- Chat and resources shared during the session are viewable for room participants.
- Delegates have access to resources, but only the organiser has access to any links. If a link is shared by the meeting organiser, then participants will have access to it.
- Breakout rooms is not supported for a delegate who joins the same meeting and same account from multiple devices.
Practise Facilitating with Breakout Rooms in Microsoft Teams
Using the breakout rooms feature in Microsoft Teams is very straightforward and you’ll pick it up in no time, especially with practice. As with anything new, it’s a good idea to build your confidence first with some dry runs and trial sessions before you use it for the first time to facilitate something important, or with a large group of people.
It really is much easier to run breakout rooms with this new functionality that it was before, and I hope you enjoy using it in your virtual facilitation.
Next steps
Join my free Idea Time for Workshop Facilitators private Facebook Group
If you’re interested in facilitation and developing your professional practice as a facilitator, I’d love you to come and join me in my free, private Facebook Group, Idea Time for Workshop Facilitators.
As well as a fantastic community of likeminded people, you will get access to free facilitation trainings, tools, techniques and time savers.
Get my free Supercharge Your Virtual Engagement on Zoom Video Course for Online Meetings
If you’re also a Zoom workshop facilitator, click the button below to get my free Supercharge Your Virtual Engagement on Zoom Video Course.
Yes please – sign me up for Supercharge Your Virtual Engagement on Zoom Video Course for FREE!