Posted in Blog, Facilitation by Jo North
How to Co-create a Minimum Viable Product (MVP) Outline in an Innovation Sprint
Last month, I led an innovation sprint focused on creating a Minimum Viable Product (MVP) outline for a data automation project. Since I often get questions about my workshop methods, I’ll share some tips and activities that can help you when running a Minimum Viable Product workshop as part of your design sprints or innovation strategy.

What is a Minimal Viable Product (MVP)?
An MVP is a stripped-down version of a product that has just enough features to please early users and collect valuable feedback. It’s all about getting your product to market quickly, and using user feedback for ongoing improvement.
Why Speed Beats Perfection
Waiting for a perfect product can waste time and money, and even allow your competition to get ahead. Instead, aim for progress over perfection. Your focus should be on hitting the right balance between effort and outcome.

When Do You Need a Minimal Viable Product?
Creating an MVP is commonly done in tech projects. However, the approach is relevant for any new product or service. You’ll want to have an MVP when you’re ready to validate your concept with target customers.
Why it’s a Good Idea to Have an MVP Outline
To be commercially successful, it’s essential that your new product or service idea genuinely solves a problem for your target customers. Share on XAn MVP outline helps you understand the value your idea brings to the end user. This document should help anyone grasp what you’re trying to build, without having to dive deep into technical details.
How Will Your Target Customer Use Your Innovation?
Think about how your target customer will use your product. Ensure the user experience flows smoothly from start to finish. A well-planned MVP outline helps you build a first-generation version efficiently and economically.

What Should Your MVP Outline Include?
The Main Feature
Identify the single-most important action for your users. This is the main feature.
Additional Features
Sort items that are additional to your main feature into these categories:
- Must-haves
- Nice-to-haves
- Must avoids
Someone separate from the project should be able to pick up your MVP outline and get a clear idea of what you want to build.

Even when your product or service innovation is a non-tech solution, use your outline to shape a simple physical prototype, or early working concept. You do this either in 3D or 2D. Try perhaps using junk modelling materials, lego, play doh, plasticine or other materials, or through doodles and sketching. These methods can lead to surprisingly insightful ways of understanding your MVP.
Remember that your MVP is simply an experiment designed to test your concept with customers before you invest more time and money in developing a more refined solution. Test your ideas with potential early adopters to accelerate your innovation process.

Low-Fidelity Prototyping Methods
When you’re ready to prototype your MVP, here are a couple of quick, easy and less technical ways of testing your idea. These methods are from design thinking methodology.
Wizard of Oz Prototyping
Create a user experience that seems real to gather feedback, without building the actual solution.
In the classic story of the Wizard of Oz, Dorothy and her friends go to see the Great and Powerful Wizard of Oz only to discover that he’s a fraud with no real magic.
Wizard of Oz Prototyping means creating a user experience that looks and feels very realistic, but is an illusion created to test an idea and generate a lot of really useful feedback very quickly and early on in your design process. The approach also means that you avoid incurring the cost of having to build the real solution.
Prototype Storyboard
A storyboard is a method originally used by film makers to depict how a storyline will unfold, scene by scene. It has become a helpful tool in design sprints and innovation workshops.
The Prototype Storyboard technique is a great way of testing the linear flow of how the user experiences your innovation. The storyboard should include any problems the user is experiencing and how they are likely to overcome those problems.
Storyboarding puts the person at the centre of the innovation development. It’s a really low cost, simple way of presenting your ideas to your target audience for testing.
You just need some pens and paper, and don’t have to exhibit any artistic flair whatsoever. The only important thing is to make that the stages and actions are clear.
Tips for Creating a Prototype Storyboard
To create a great prototype storyboard:
- Be character-driven: Characters are a great vehicle to express deep human needs and generate empathy and interest from your audience.
- Have dramatic action: Your story should have 3 components: Action, Conflict, and Transformation.
- Action: What is the character trying to do? What are the actions she is taking to achieve it?
- Conflict: What is in her way? What questions linger beneath the surface?
- Transformation: What is the big insight? How do the action and conflict resolve?
- Be as detailed as possible.
Minimum Viable Workshop Agenda
Here is a great process that I use when I’m facilitating a Minimum Viable Product workshop The process consists of activities designed to identify:
- Target state
- MVP features
- Useful solutions
1. Target state
The target state Minimum Viable Product workshop activity helps delegates to start with the end in mind. Doing so is really useful because it creates context and focuses delegates’ thinking on the goal.
Allow about 30-45 minutes for this technique.
You will need old newspapers and magazines, glue sticks, sticky notes, pens and scissors.
Brief your delegates along these lines:
The ‘target state’ means your vision of how things will work and what the benefits will be once your MVP has been created.
Work in your groups to use the materials provided (you can cut or tear out images and headlines and stick them down) to create a visual / poster that shows your vision of the target state for your MVP specification. Spend about 15-20 minutes or so on this.
Describing the Minimum Viable Product
Then ask delegates to work together to write a description of their MVP to include:
- Descriptive title
- Scope (what is in and out of scope)
- A short ‘elevator pitch’ statement
- Why you have chosen to focus on this
- Who will benefit and how?
2. MVP features
Ask delegates to have a team discussion (in small groups) to agree and write down the specific features of their MVP. These need to include:
- The single, most important feature that it MUST have
- Additional features that you want to be included, categorised as:
- Must have – and why
- Would like to have – and why
- Must avoid – and why
3. Useful solutions
Ask participants to list the technology and solutions that could help to create the MVP. They should then plot each of them onto this grid in the image below. You might like to re-create this grid on a flipchart or whiteboard, and use sticky notes.
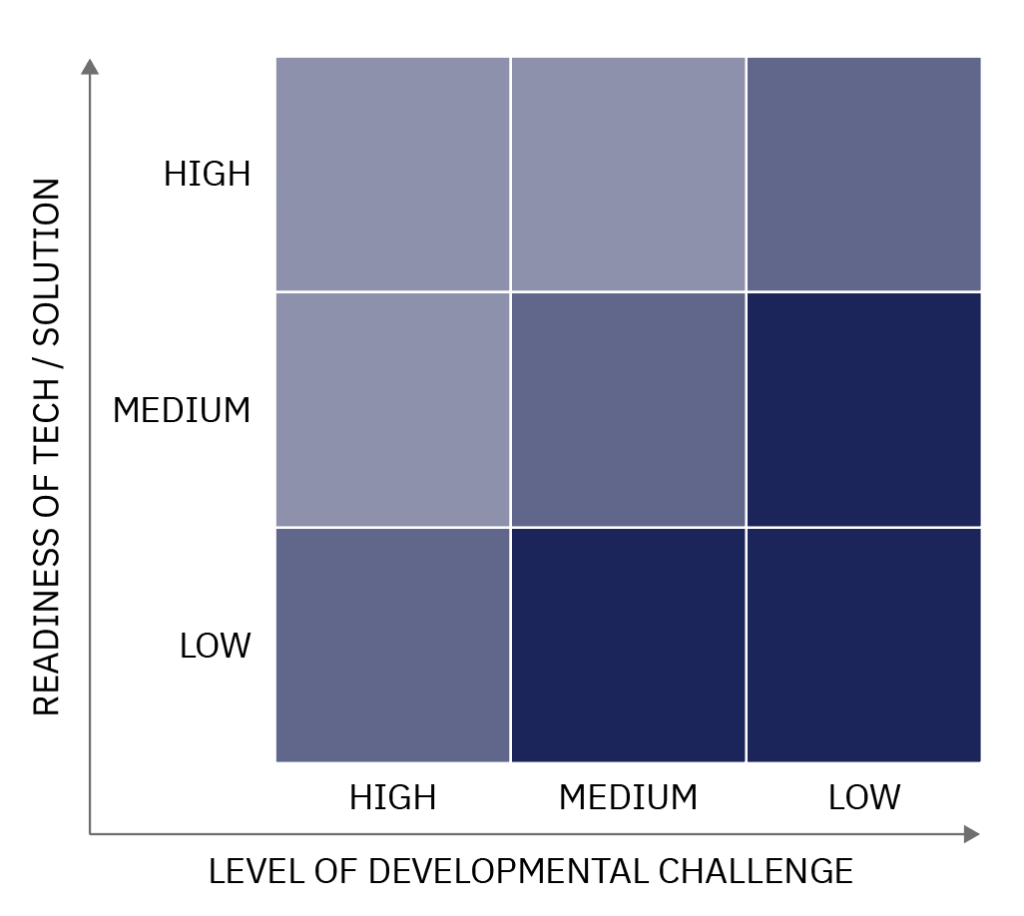
That’s it – at the end of these activities, your delegates will have created their MVP outlines. Hopefully, they will also have enjoyed the collaboration process and achieved some great work. Participants will also have a clear view of the tools and solutions available to them to help create their MVP.
Advanced Tips for Facilitating a Minimum Viable Product Workshop
Conducting an effective Minimum Viable Product workshop is crucial for any team aiming for successful product development. While MVP workshops are not new, the devil is often in the details. Here are some more advanced MVP workshop facilitation tips.
Customer-Centric Planning: User Personas and Pain Points
Building user personas should be an essential step. Team members can rely on market research and user research to understand customer needs and identify pain points. The best way to validate your product idea is to ensure it solves actual problems for your end users. Your innovation needs a strong value proposition for successful commercialization.
Setting the Stage: Product Vision and Objectives
Make sure that your workshop establishes a clear product vision and business objectives. Eric Ries, the author of “The Lean Startup,” emphasizes the importance of understanding your potential customers right from the beginning. Use this information to set a clear vision, so every team member understands the purpose and direction of the innovation.
Explore Lean Inception Methodology
Lean Inception is a methodology that aims to align cross-functional teams around the key aspects of a new software product. Originated by Paulo Caroli, it’s particularly effective for facilitating more advanced Minimum Viable Product (MVP) workshops. Here’s how you can employ Lean Inception for a highly effective, advanced MVP workshop.
Kick-off: Aligning Teams and Business Objectives
Start by aligning all team members, including product managers, designers, and engineers, around your business objectives. This sets a clear stage for the entire workshop. Everyone should understand the product vision, business model, and the target market you aim to serve.
Day One: User and Market Research
Lean Inception advocates for an in-depth look at the needs of potential customers and end users. Use market research data to create user personas, which are vital in understanding the different use-cases for your software product. With this information, you can accurately define customer needs and identify pain points.
Product Vision and Canvas
Lean Inception uses the Product Canvas tool to capture the essence of the product strategy. This canvas helps to distill your product vision into actionable user stories and features. The Product Canvas becomes a living document that offers guidance to the entire product team.
Generating User Stories
Working closely with your design and engineering teams, translate user personas into user stories. These stories will encapsulate the main features that your MVP will offer. Storytelling is an invaluable step in identifying the core features that need development.
Prioritization and MVP Features
At this stage, prioritize the user stories and features based on business objectives and customer needs. The goal is to identify the key features that constitute your MVP. A well-facilitated Lean Inception workshop will align the whole team on what’s necessary for the MVP and what to park for future iterations.
Prototyping and Feedback
The engineering team can now start developing low-fidelity prototypes based on the prioritized features. Simultaneously, gather early customer feedback to validate these choices. This ensures that you’re on the right track and allows for course correction before significant resources are committed.
Build the MVP Roadmap
Product owners and project managers should collaborate on developing a Minimum Viable Product roadmap. This will show your planned iterations of your innovation beyond your MVP. Decide which of the “nice to have” features you’ll include in future versions, and at what stage.
By incorporating Lean Inception approaches into your Minimum Viable Product workshop, you add an extra layer of focus and precision. It helps to ensure all team members are on the same page. Plus, it maximizes resource efficiency, and significantly increases the likelihood of launching a successful product.
Iteration and Agile Methodology
Lean Inception aligns well with Agile methodology and project management, allowing for iterative development and constant improvement. Use your Minimum Viable Product workshop to set the stage for a dynamic environment where product managers, engineers, and designers collaborate effectively.
Test, Feedback, Repeat: Customer Feedback Loop
Business model viability often depends on an iterative approach of test fast, fail fast, learn fast and go again.
Successful companies prioritize a feedback loop involving potential users. Techniques such as “Beta Demo” can be particularly effective, giving your product team and tech teams a chance to make quick adaptations.
Beta Demo
A beta demo is a near-final version of a Minimum Viable Product (MVP) that is shared with a select group of users to get real-world feedback. Unlike an internal demo used for team reviews, a beta demo is exposed to potential customers. This is to test its functionality, identify bugs, and validate the product’s fit with customer needs.
Focus on Early Adopters
The beta demo serves as a critical checkpoint before the full launch of the product. It contains the core features that have been identified during the MVP development process as essential to meet customer needs and business goals.
By putting the beta demo in the hands of early adopters, you can collect valuable information on how the product is used and what improvements may be necessary.
Bridge the Gap Between Internal Development and Market Release
The beta demo step is vital because it bridges the gap between internal development and market release. It allows the product team, including product managers, engineers, and designers, to make data-driven decisions. Based on the feedback, the team can make final adjustments to the product before it goes to market.
Next Steps
I hope that this has given you some ideas for your own events in the future. If you’d like any tips, ideas or advice, do feel free to contact me here.
We also provide exceptional creative facilitation training courses and programmes. If you’d like more information to help you run your own events, download my free DIY Away Day toolkit. It’s a great resource and contains an agenda, instructions for all the creative techniques I suggest plus my top tips for successful creative facilitation.
If you’re interested in accessing our creative facilitation training online, come and join my free, private Idea Time for Workshop Facilitators Facebook Group. I’d love to work with you to help you become the best creative facilitator that you can be.
About the Author
Founder and CEO of The Big Bang Partnership Ltd & Idea Time. Innovator. Author. Business Coach. International Keynote Speaker & Facilitator. Director Technology & Transformation at Port of Tyne. Leader of the UK’s Maritime 2050 Innovation Hub. Non-Executive Director. Associate in Business Innovation and Creativity at University of York.